
Solar Assisted Heat Pump Installation: 2025 Step-by-Step Guide and Key Considerations
January 14, 2025
The Complete Guide to Solar Battery Storage Installation: How to Add Battery Backup to Your Solar System
February 15, 2025
Key Takeaways
- A solar PV system will help reduce energy bills and your carbon footprint.
- Designing a solar PV system requires calculations, panel selection, and proper area selection for installation.
- Installation involves evaluating sites, mounting panels, wiring, and connecting the setup to an inverter.
- The legal considerations and safety considerations are regulation compliance and the need for good grounding, respectively.
- To maintain optimal efficiency, regular maintenance, like washing panels and monitoring performance, is crucial.
- Professional installation ensures safety, compliance with regulations, and long-term system performance.
Of the most popular but green, cleaner energy solutions and those that can be producing energy for properties for very long would be a solar PV (photovoltaic) system drawing its energy from the photovoltaic effect of the sunlight. This extensive guide should assist you in determining how to best configure and install a solar PV system at your home or business.
If you’re battling your energy bills or just would like to add more green energy to your home, consider this your cheat sheet on how to get it done in the most effective and eternal fashion.
Table Of Content
- Key Takeaways
- Table Of Content
- Understanding Solar PV Systems
- How to Design a Solar PV System for Your Home
- How to Install Solar PV Panels Step-by-Step
- Legal and Safety Considerations
- Common Questions About Solar PV Installation
- Maintenance Tips for Your Solar PV System
- Why Choose Professional Installation?
- Conclusion
Understanding Solar PV Systems

Solar panels take in sunlight and convert it into direct current (DC) electricity. An inverter then changes that direct current (DC) electricity into alternating current (AC), which most household electrical devices use.
A solar PV system consists of the following primary components: solar panels that harness sunlight; an inverter that converts direct current (DC) to alternating current (AC); a mounting system to securely attach the panels; and wiring and connectors that link the system. The solar PV systems can be configured to roof, ground or BIPV networks depending on the installation site.
Since solar energy is a green and renewable source of energy, it energises the earth with much lower carbon footprints due to the efficient harnessing of solar resources than conventional energy generation sources. But over the long-term, solar PV systems can pay off, and that means significant savings for many home owners, and thus a worthy investment.
How to Design a Solar PV System for Your Home
Designing a solar PV system is a complex process that requires a lot of planning and design in order for you to meet your energy needs while ensuring maximum efficiency. Here’s a step-by-step guide to help you get started designing a system that’s right for your property:
1. Assess Your Energy Needs
Your initial step is to evaluate your electricity bills and assess your typical energy usage. Given that solar systems are generally sized to negate a percentage of your consumption, understanding how much you consume over the course of a month is your foundational first step. Think about potential changes down the road, like a new appliance, electric vehicle or something else that will significantly increase your energy use.
2. Calculate the Number of Solar Panels
The number of solar panels you will need will depend on how much energy you use, the efficiency of the panels you purchase and how much sunlight your particular area gets. There are a few slightly different approaches as to how to arrive at that number, but a basic way to do it is to take your average monthly energy consumption (measured in kWh) and divide it by the output one panel would produce, typically 250 to 350 watts. Local weather and panel efficiency can impact total output.
3. Choose the Right Type of Solar Panels
Well, there are monocrystalline solar panels and polycrystalline solar panels. Monocrystalline panels need less space and have higher efficiency, but they also tend to be more expensive. Despite having a lower efficiency and needing more area to generate the same output, polycrystalline panels are cheaper. The option you select will depend on your budget and space available.
4. Determine the Best Installation Location
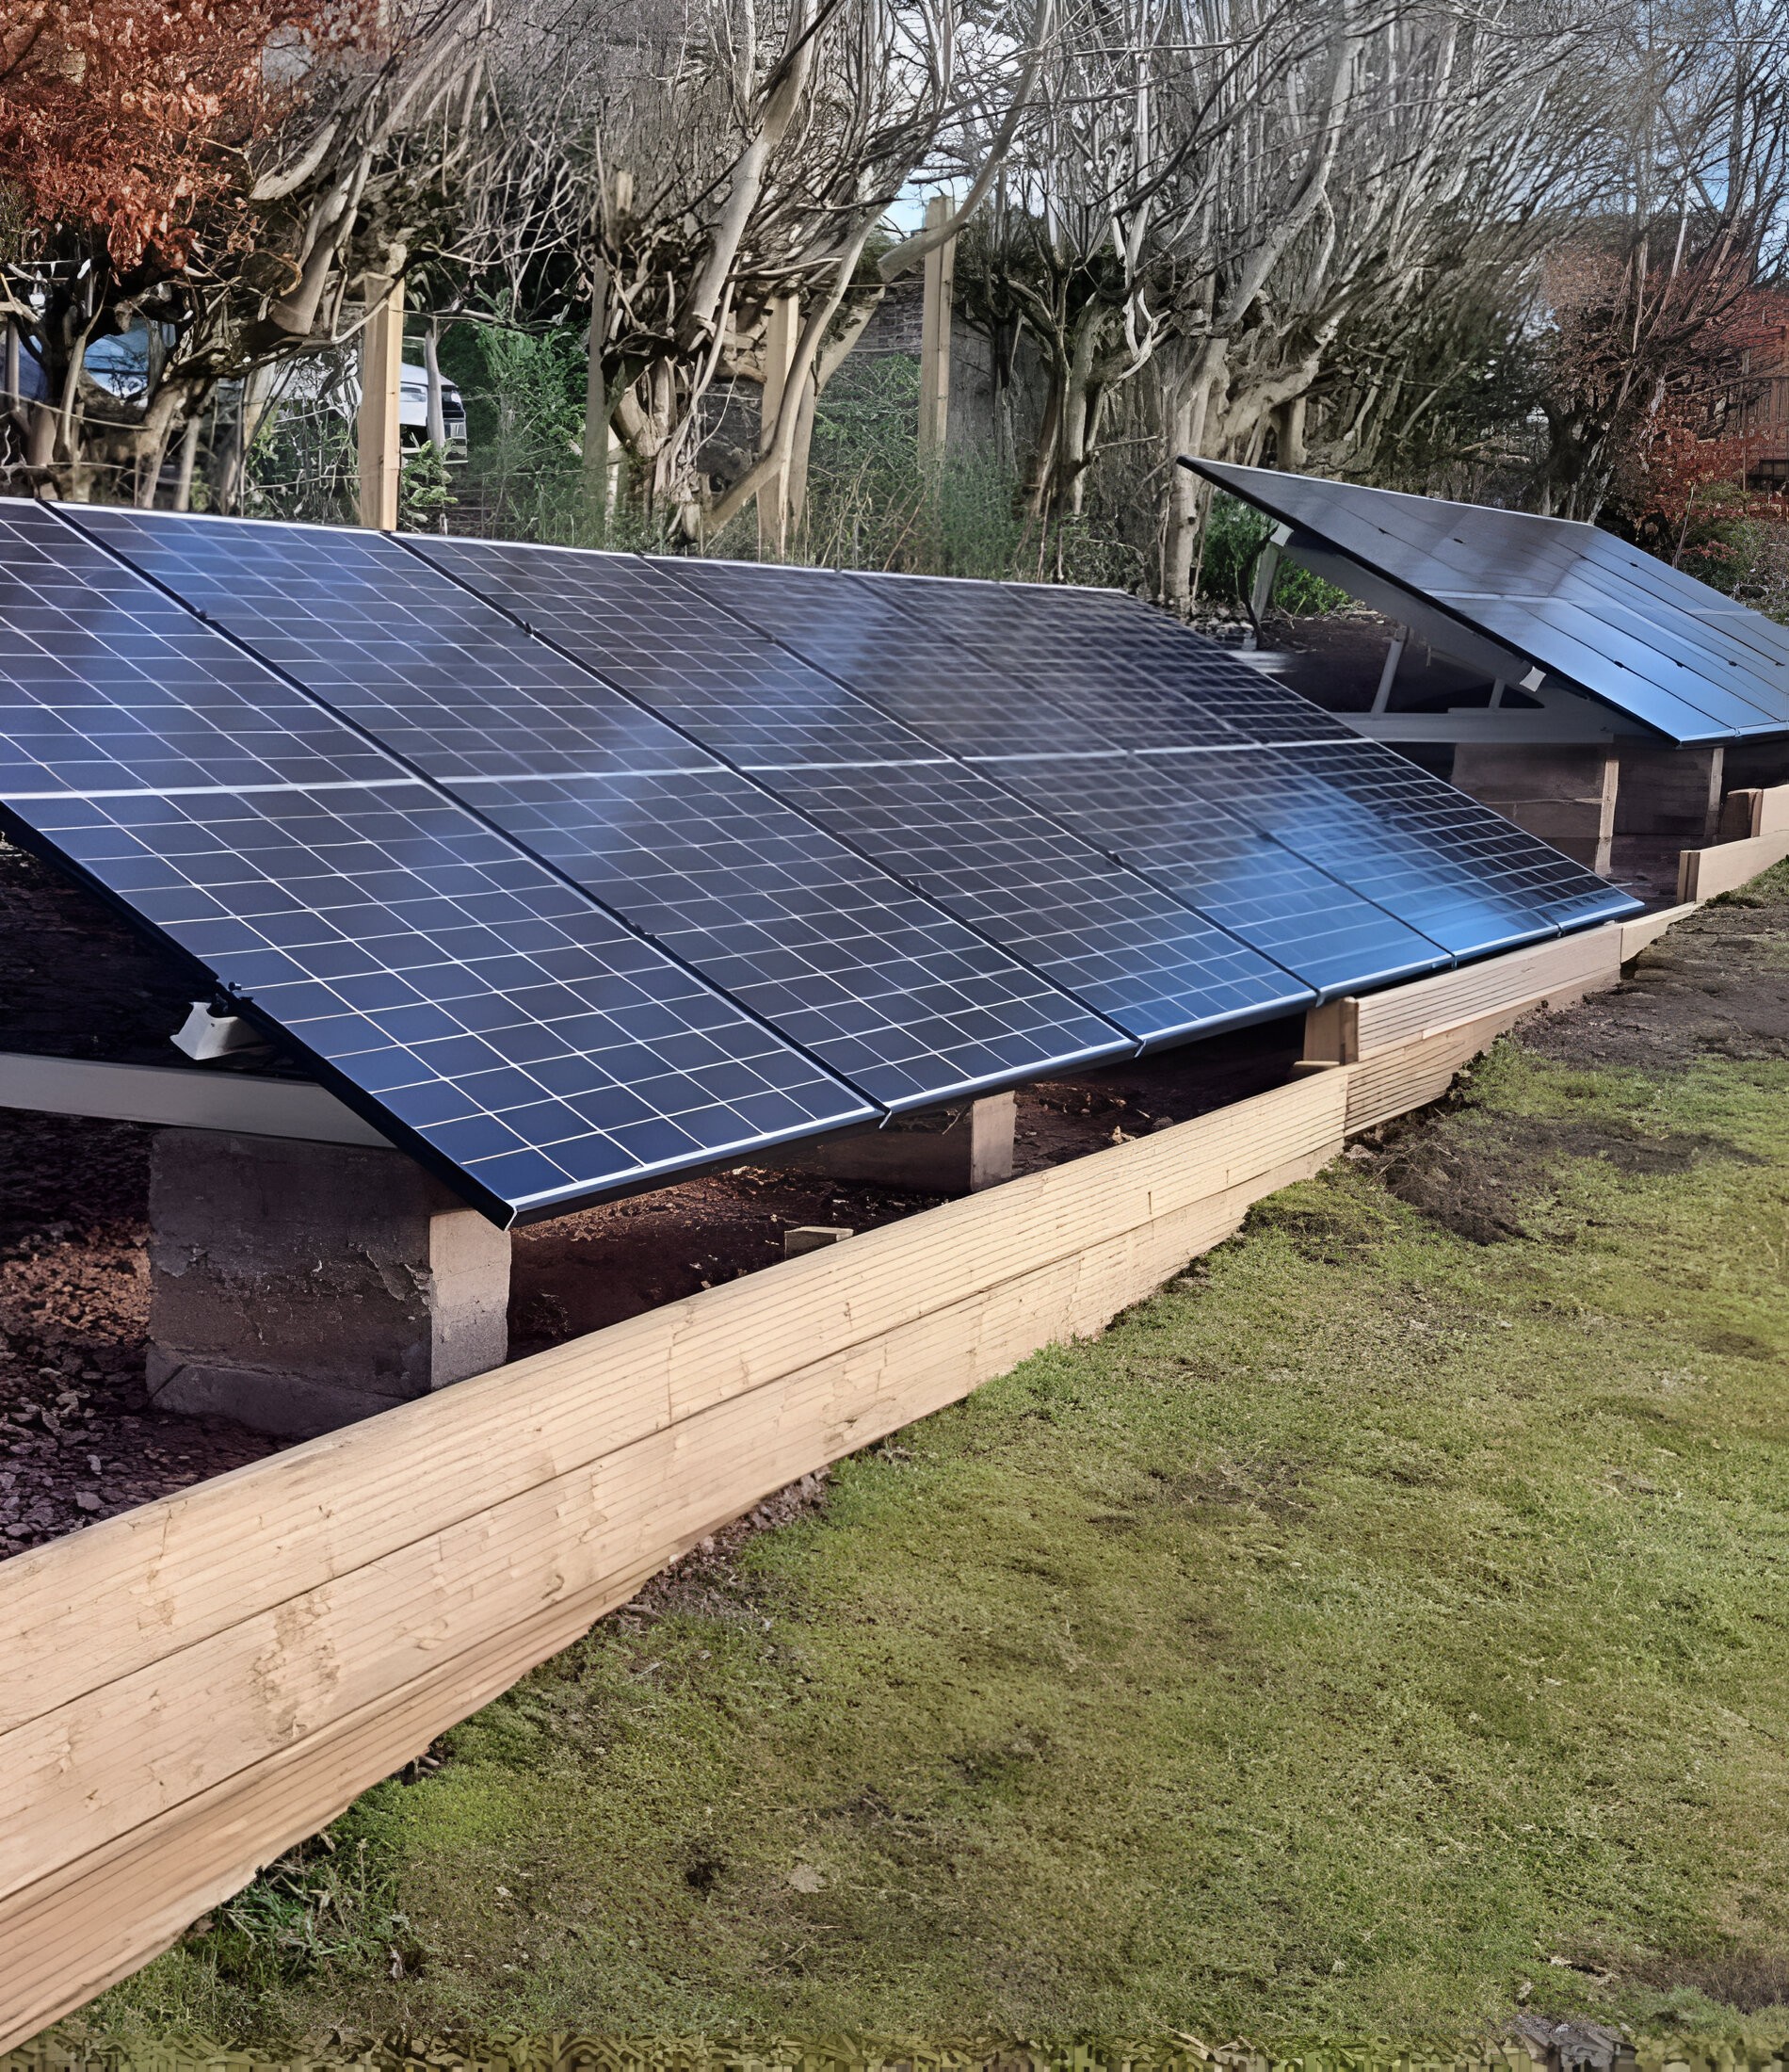
Solar panels are primarily installed on roofs, though you can consider ground-mounted systems, too. Choose a space that has excellent sun exposure, preferably a south-facing spot for Northern Hemisphere locations, and should have no shading during sunlit hours.
5. Consider Additional Components
Your system design also entails selecting an appropriate inverter and mounting system. Inverters turn DC power into AC power, and mounting systems keep the solar panels securely in place. It is important to select components that align with your home structure and energy objectives.
Download solar PV design guides, if necessary, to assist you in your calculations so the system is perfectly right for your needs.
How to Install Solar PV Panels Step-by-Step

The process of installing a solar PV system includes the following components. Here is a step-by-step guide that will help you understand the process of installing solar panels for your home or business.
1. Site Assessment
Before installing the panels, a suitable site assessment is necessary. The roof load or the area where you are going to put the panels should be the first aspect you need to check. Make sure that the roof is strong enough to hold up the panels, and ensure low shading at peak sunlight hours. The best orientation for solar panels is south-facing (in the Northern Hemisphere) with an angle of about 30 to 45 degrees for maximum sun exposure.
For ground-mounted systems, the same factors apply—select a location to enjoy optimal sunlight exposure, steering clear of obstructions such as trees or nearby buildings.
2. Mounting System Installation
The following step is installing the mounting system which will hold the solar panels in place. You can get fixed-angle, adjustable-angle, and tracking mounts.
Fixed-angle systems: Angled at a fixed angle and usually the cheapest option.
Adjustable-angle systems: These — which let you adjust the angle to optimise your collection of sunlight throughout the year — are more complex.
Tracking systems: These follow the sun throughout the day and are the most efficient but can also be more expensive.
The first step is to attach the mounting rails to either the roof or ground-mounted structure. Ensure that the rails are level and securely anchored to avoid any movement over time. Use the correct fasteners to attach the rails in a way that is waterproof to prevent leaks.
3. Panel Installation
After a proper mounting system is installed on the roof, you can install the solar panels. Align the panels onto the rails. Make sure they are evenly spaced and that there is enough distance between each panel for ventilation and expansion.
- Panel spacing: Panels should be arranged at such a distance so that they do not shadow each other. The ideal gap between panels typically ranges from 1 to 3 inches.
- Location: The panels should be facing the right way (generally to the south), and you also need to follow the instructions that came with your panel.
Once they are aligned properly fix them up to the mounting system using the recommended fasteners and fix them properly.
4. Electrical Wiring
When connecting solar panels to the inverter and power supply, follow these steps carefully:
If it is a series (or parallel) connection, connect the panels using DC-rated cables. Consequently, ensure that the cables are properly secured to eliminate any movement which might cause wear or shorts.
The DC wiring coming from the panels should be connected to the inverter. The inverter takes the direct current (DC) electricity that is created by the panels and turns it into alternating current (AC) electricity that your property can use.
You should use the appropriate gauge of wiring and be sure to follow all of the electrical safety protocols. You can also use weatherproof cable conduits to keep the wiring safe from the elements.
5. Inverter and System Connection
Once the panels are wired, the inverter must be installed. Install the inverter at a cool and dry place, preferably close to the electrical panel. Follow the manufacturer’s guidelines for connecting the inverter to the grid and the solar panels.
Connecting the inverter to the electrical panel with suitable AC wiring. For grid-tied systems, the connection will need to comply with local regulations and may necessitate a licensed electrician.
Make sure the panels, wiring, and inverter all have proper grounding to prevent electric shock.
6. System Testing
Once the installation is complete, making sure that the system is safe and functional is very important:
- Verifying connections: Ensure all wiring connections are tight and no exposed or loose wires are present.
- Inverter: Switch on the inverter and ensure it is working well. Depending on the model, some inverters may even have a display screen that provides real-time data like the power output.
- Monitoring: Most inverter manufacturers will give you an app or an online platform on which you can monitor the system’s performance. This will allow you to ensure the system runs at its maximum capacity.
Legal and Safety Considerations
Solar PV system installation must adhere to legal and safety requirements. In the UK, you can do DIY installation, but there are rules to follow, including building regulations and electrical safety compliance. Make sure this is installed in accordance with local planning regulations, particularly where you have a listed building or a location that is within a conservation area.
Other safety considerations (but not limited to) include grounding the panels to avoid electrical representatives, getting quality wiring and preserving the structural integrity of your mounting system. When looking to wire anything electrical and ensure you are following safety codes while limiting your liabilities, professional help is advised.

Common Questions About Solar PV Installation
Can you install PV yourself?
DIY installation is best for those with technical know-how, but be sure to follow your local building and electrical codes. For electrical connections, always hire a professional.
How are solar PV panels installed?
This installation is carried out by placing solar PV panels on a roof or on a ground structure, with a mounting system securing it. The panels wire to each other, which then wires to an inverter that will convert your DC (direct current) to AC (alternating current) to be used by your home. This system is connected to either the grid or to a battery storage unit.
What are the steps in PV system installation?
The steps include site assessment, installation of the mounting system, placement and anchoring of the panels, wiring the panels to the inverter, and connecting the inverter to the home’s electrical system. The last stage is testing and monitoring to confirm everything is working properly.
Is solar panel installation easy?
Solar panels are not necessarily easy to install, especially for those who lack experience. It needs technical knowledge of electric systems, safety measures, and appropriate installation.
Can I buy a solar system and install it myself?
Yes, you can purchase a solar system to install by yourself, in that case, just make sure you have the right skills and tools and check your local regulations before rolling up your sleeves. Usually, a professional job is safer and more reliable.
Maintenance Tips for Your Solar PV System

- Routine Cleaning: Ensure the panels are free of dust, debris, and dirt. Avoid scratching the surface with abrasive cleaners; instead, use a soft brush or cloth with non-abrasive cleaners.
- Look for Damage: Regularly inspect for visible damage: cracked panels, loose wiring, damaged mounting structures, etc. If any issues arise and are sorted in a timely manner, it should prevent any further performance degradation.
- Inverter Monitoring: Monitor energy production and efficiency using the inverter. If there is a dip in performance, it could mean there is a problem needing to be addressed.
- Inspect Wiring and Connectors: Verify that all wiring and connectors are in good condition without any wear, corrosion, or loose connections causing power loss.
- Trim Neighboring Vegetation: Keep up on trees and bushes since they can shade and drop branches onto solar rein.
- Professional Inspection: Have a pro come out to give you a baseline for your system and review it every couple of years to ensure your system is at peak performance and any potential fails are caught before becoming a big problem.
Why Choose Professional Installation?

They assist in ensuring that the system is properly installed, adheres to specific local regulations, and optimises the efficiency of the system. Expert installers possess the expertise needed to handle intricate electrical installations, prevent potential risks, and ensure accurate grounding of your system. They can also help you choose the best size, placement, and components for your system.
And not only does that allow for a safe and seamless installation, but it also allows for a dependable repair if and when that’s the case in the future. Installing your system is a time- and energy-saving decision in the long run — not to mention avoiding paying for mistakes.
Conclusion
Designing and installing a solar PV system on your property are excellent ways to save on energy bills and help the environment. Following the steps above can help you with a good installation and healthy long-term functioning. But to avoid complications and help guarantee your system is installed safely and properly, we would highly recommend a professional installation.
Fitting this class of solar for your home or office will need a little assistance from the corporate world, which is where Scottish Energy Saving comes in. Reach out to us for a consultation or quote today and move towards a more sustainable future!